"I am always doing what I cannot do yet in order to learn how to do it." Vincent
Van Gogh

Tuesday, June 5, 2012

Crochet Beaded Sandals Tutorial

A while back I did a tutorial on how to add beads to crochet thread easily...  I finally bring you the reason why...bahahaha


My thought for the day:

The greatest beauty about the gifts that God gives us is that they increase the more we give them away. When we hold on to our gifts, our anointing, our blessings, it is then that we will see them decrease and find ourselves struggling to find what once was. If you want more of something, than give it away.


Please comment: Leave your thoughts behind.  Would love to do more and would love to know it is appreciated.  Thank you
Anna Boyd

Monday, June 4, 2012

Easy Microwaved Box Cake in a Mug

Have you ever craved a piece of cake, but you don't have a cake let alone a piece of one?  Well, fear not dear friend I have an answer to your dilemma (as long as you have a box of cake mix).

What you need:
  • 1 Box of cake mix in your choice (I'm doing white)
  • Water
  • Whisk
  • 1/4 cup measuring cup
  • Coffee mug-necessary for the whole "Cake in a Mug" thing.  I guess you could use something else, but that would totally ruin the point.
  • Topping of choice (I've got strawberries and a cream cheese icing)

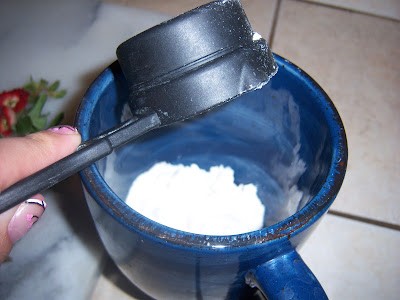
First, you want to take your mug and measure out 1/4 cup of cake mix into it like so:

Next you want to (or you should, can't make you but it won't turn out right if you don't) add 1/8 a cup of water to your mug.  I usually just add half the quarter cup cause I'm too lazy to find an 1/8 a cup, if they even make one, so....yeah.

Take your little whisk and whisk it together.  It should have a pudding like consistency.
Like so.  
Next put in your microwave and cook for two minutes on half power.


Allow it to cool for a bit and add some toppings (I tried to take a pic but there was too much glare, but you can see my topping ;).


And enjoy...
Pssst...don't forget coffee ;)

Saturday, June 2, 2012

My Diva Cup Adventure

Ok, so just so you are warned odds are this post may contain a little bit on the side of TMI.  You've been far warned.

First off, the reason I wanted to dive into this personal experience is because I have a condition called Uterine Didelphs.

This is a Uterus


Notice how it is normal, well, if you didn't know what normal looked like then now you do.


This is Uterine Didelphys.  It looks like there are two uteri but the truth is that it is one that is in half, or better put, only half grew on each side.
Each uteri side has it's own cervix and vaginal canal.
Now, I don't have two vaginas people.  I get that a lot, no, I really only have one on the outside.
I'm a tiny bit different than what is pictured as my uteri are a little more connected with a wall that separates them, and my left cervix is smaller than my right.

Okay, now you know my medical condition lets move on to the Diva Cup.
The Diva Cup  is a menstrual cup.  More information on it exactly can be found at the Home Website for The Diva Cup

This will explain in good detail what the Diva Cup is and how it is used, etch.  


Okay, now into the more personal stuff.  I just had to start using the Diva Cup yesterday, and it's been about 24 hours since I started using it.  It took about ten tries to get it in right, but once I did I was very glad.  It takes some getting used to, but I found it so much nicer than tampons or pads.

Also, I have not been cramping the way I usually do.  Now, that may be too soon to say much because I had a new baby in December and just started my period the first of  June.  (Yes, I am still breastfeeding for those wondering. I only breastfeed).  I'm just one of those lucky ones who have a period while lactating.
I did have some issues with it last night, leaking over night but not until the morning.  I looked it up and this usually happens if not inserted correctly, so I figured that's what happened because I know it wasn't the cups fault. ;)
I'll have more updates as time goes on and I get a better hang of it, but I am already loving it, plus the money I'll  save not buying tampons or pads.

Let me know if you have any experience with the Diva Cup or just if you have Uterine Didelphys.  I love to hear from you. :)


Friday, June 1, 2012

Crocheted Barefoot Sandals Free Pattern


Triangle Fan Barefoot Sandals Pattern
Materials Used:
Iris 100% cotton embroidery floss in five different colors (the same color can be used), if doing five different colors, 1 of each color in the center and 2 of the border color, change color after each row by finishing off the row and adding new color.
Size 1/ 2.75mm crochet hook
Clear nail polish
No gauge
Abbreviations
Ch
Chain
Ss
Slip stitch
Sc
Single crochet
Trc
Treble/triple crochet
3chpc
3 chain picot-chain 3 Ss in 3rd chain from hook
5chpc
5 chain picot-chain 5 Ss in 5th chain from hook
*
Repeat-used in each row-do not repeat * from previous row

Pattern:
Chain 5
Row 1: Trc in 5th chain from hook 4 times, Ch 4, *Trc 5 times in same chain as previous Trc, Ch 4* repeat * 1 more time, ss in 4th chain from base chain 5 (do not turn)
Row 2: Ch 1 Sc in same space (top of chain 5), *Ch 3, Sc in top of next Trc and repeat across each Trc with 3 Sc in between (4 Ch 3 spaces total).  Ch 2, Sc in Ch 4 space, 5chpc, Ch 2 Sc in top of next Trc.*  Repeat * around and Ss to join.
Row 3: Ss up into Ch 3 space, Ch 1 Sc into Ch 3 space, *Ch 3 Sc into next Ch 3 space, repeat again for 3 Ch 3 spaces, Ch 4, Sc in previous 5chpc and then 5chpc, Ch 4* Repeat * around and Ss to join
Row 4: Ss up Ch 3, Ch 1 Sc in Ch 3 space,* Ch 3, Sc in next Ch 3 space, Ch 3 Sc in next Ch 3 space.  (2 Ch 3 spaces).  Ch 7 sc in previous 5chpc and then 5chpc, Ch 7 Sc in top of next Ch 3 space *and continue* around and Ss to join
Row 5: Ss up Ch 3 space, Ch 1 Sc in same Ch 3 space,* Ch 3 Sc in next Ch 3 space, **Ch 3, 3chpc, Ch 2, Sc in Ch 7, Ch 3, 3chpc, Ch 2**, Sc in 5chpc, Ch 7 and then Sc again in the 5chpc, repeat ** Sc in Ch 3 space and repeat * around Ss to join and finish off.
Triangle made.
For the Ch going over the toe, connect to one Ch 7 corner and Ch 20-30 depending on toe size.  You know your toes better than me, ;).  Sc again into the Ch 7 corner and finish off.
For the straps, in each of the last two Ch 7 corners Ch 150-200 depending on preference, finish off.
For each area finished off you can add a drop of clear nail polish to make the knots more secure.

If you have any questions please don’t hesitate to ask, this is my first pattern so I hope it makes sense.  A drawn pattern is included for reference if you have trouble.


For more FREE patterns consider donating :).  This will help me write more free patterns as my husband will be encouraged that I'm not wasting my time, lol.

:)  God Bless


Want to make your own symbol patterns??  Please check out my Crochet Symbol Font with tutorials to come explaining how you can create your own circular, linear, and triangular patterns.

Crocheted Flower Ring

So, while watching Conspiracy Theories with Jesse Ventura last night I crocheted a flower ring. Do you like? 

I'm thinking I'm gonna post a free pattern for this later. I'm still writing up the free barefoot sandal pattern and will have that later today (fingers crossed). I need to write up my pattern I'm selling cause I need the dough, but what can I say, I get greater joy in giving things away. ;)

Thought for the moment:

You are responsible for YOUR walk with God. You are not responsible for anyone elses walk. You can help and gently guide, but don't judge because their walk is not your walk and you don't know the path God is guiding them on.

To a dear friend who is loved by God with an Everlasting Love. True friends hold you in your trials, they never kick you when you're down.