I love the treasuries that get put together by the CAPS team but don't always get to posting them. Hopefully I'll get in a better habit of it.
The first Treasury we have is Hats Off to the Caps Team
My fave item from this treasury, though they are all good, is the Chocolate Strawberry Dream Cake Earrings from the Blushing Dove Boutique.
The next treasury we have is called Shades of BLUES
My fave from this treasury is the Guitar Pick Earrings by Clever Crafter
And last we have Colors From Nature
My fave from this treasury is the Lattice cup cosy (for coffee cups) by Chocolatedogstudio. I have told myself so many times I'm gonna make me some of these, not to sell cause I have too many other ideas in my head, but to make in my all time fave butterfly fabric, but if you are not crafty then be sure to pick one up from Chocolatedogstudio!
"I am always doing what I cannot do yet in order to learn how to do it." Vincent
Van Gogh
Thursday, July 29, 2010
Wednesday, July 28, 2010
My Second Space Painting
This is my second attempt:
What have I learned so far: the cheap paints suck. Krylon goes for $3 and is way better than the $1 paints not just in consistency but in the nozzle itself. So, definitely going to Lowe's to get some better paints.
What have I learned so far: the cheap paints suck. Krylon goes for $3 and is way better than the $1 paints not just in consistency but in the nozzle itself. So, definitely going to Lowe's to get some better paints.
My First Space Painting
In my never ending adventure of finding new and wonderful things I can do I discovered Space Painting! This is my first one ever!
Whatcha Think???
Me so excited. I love it. I have so many ideas right now. When Etsy allows us to change names I'll be changing mine to include my dad. We are going to start doing bags and jewelry together. He is a great artist, and a big dream of mine is to sell bags with his custom art work ;), and jewelry as well. As for the space paintings, I'm going to make a bunch, mostly cause they are fun, but also to sell. We are having a big "community" garage sale up here in September and I'm going to have some out, see how it goes you know. Maybe try a few craft fairs as well, it all depends. I don't think I'll sell them online, though I may post some on etsy just to give it a go, though still up for debate on that one. I know some people sell cards, and these could make great cards. Anywho, any opinions are welcome!
Wednesday, July 21, 2010
Fabric Butterfly Necklace Tutorial
For the sake of nothing in particular I decided to make a little tutorial on how to make the lovely butterfly necklace I made before. This one I am putting for sale in my Etsy Shop, but you all I can see how I made it here, and if you are crafty you can make one too. ;)
Supplies:
Butterfly fabric of choice (I used a Michael Miller fabric) and backing fabric (can be the same or coordinating color)
Fusible webbing (or iron applique stuff you can find at Wal-Mart or your local craft store).
Quilt batting (cotton or polyester).
20 gauge wire or smaller.
regular scissors
fabric scissors
printer paper
iron and ironing board
small round eyelets (finishing washers are optional)
eyelet tool or setter
Large jump rings (gold or silver plated whichever you prefer)
round nose jewelry pliers (I use an all in one type of pliers)
cutting pliers
optional: Chain, clasp, silk thread, wire protector loops, crimp beads, swarovski bead
Okay, let's get started:
 |
| Place a couple of pieces of printer paper over the fabric and webbing to protect your iron. |
 |
| Iron your fabric pieces to the fusible webbing as directed by packaging instructions. |
 |
| Remove paper; This is after they have been ironed and are attached to the fusible webbing |
 |
| Cut out each of your butterflies using regular, sharp paper scissors (don't use your fabric scissors here because the fusible webbing has a paper backing). |
 |
| This kind of shows you what I mean by having the top aligned, but the bottom is out a little. |
 |
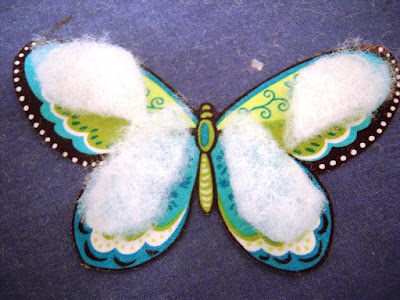
| Cut out a little batting to fill the center of the wings. Make sure there is room on the edges and center. Only fill center of wings. This is optional on the smaller butterflies. |
 |
| Peel paper off back of butterfly and backing fabric and place batting in place. |
 |
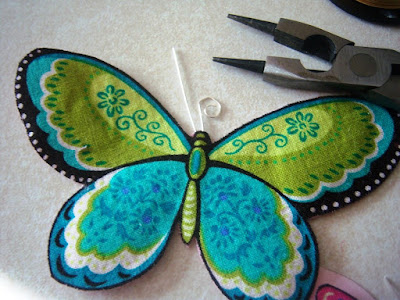
| Cut out a length of wire that you desire, fold in half and twist bottom. Place on butterfly where the antenna will come out and figure out what length you like. |
 |
| Using your round nose pliers, or multi-pliers, curl the antenna of the butterfly. |
 |
| Like so! |
 |
| Place the eyelets where you would like your chain, rope, or whatever, to be attached to the butterfly and using your tool, snap or hammer in place. |
I hope that my tutorial was clear and that you get some wonderful pieces out of it.
You can find this butterfly for Sale Here.
Tuesday, July 20, 2010
Eyelet Flower Fabric & Chain Necklace
Oh in my never ending adventure to create new things (at least to me) I have made another fabric necklace thingie-ma-bob. I actually LOVE this one. Of course, I LOVE a lot of the things I make, not all, but most. What can I say? I'm a bit bias. Anywho, just a little looksie at what I cooked up while watching a movie. Facing the Giants
Good movie, I recommend.
Anywho, I hand sewn each of the flowers using eyelet trim or lace or whatever it's called (I'm not good at technical terms), and then using a little fleece, sewn them onto the chain. It is quite lovely. I will probably make some more of these with different variations.
As always, let me know what you think!
Monday, July 19, 2010
Fabric Jewelry: My Butterfly Pendant
So, if you know me you know I am rarely satisfied with just one thing. I love art in all it's forms including the many things one can use to make jewelry. Along with polymer clay I've also discovered some other great mediums that I'm going to use too. It all depends on how much time I have on my hands, haha! My life is one busy pot of busy-ness and so I take what I can. For my latest discovery I bring you Fabric Jewelry! Kinda weird sounding, but I am bursting at the seams with ideas. I've discovered some wonderful things I can do when it comes to making jewelry and even making bags that are so very incredibly me and cool! What is an artist without the art being them? Anywho, just thought I'd show off my latest creation. I plan on making a few of these in different colors, styles, whatevers, and putting them up in my Etsy shop.
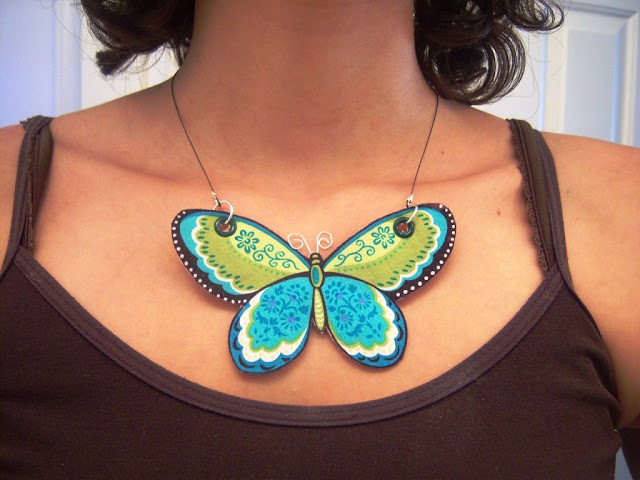
This is my Fabric Butterfly Necklace made with Michael Miller fabric.
Show your love and let me know what you think!
This is my Fabric Butterfly Necklace made with Michael Miller fabric.
Show your love and let me know what you think!
Got A Job!
Hey everyone! Sorry for the sporadic posts lately. I actually got a job, so I'll be busy but trying to get things posted and keep up with more great things. School starts the 23rd of August which will tax my time too, but it all depends on how things go, such as how easy classes are for me. My job allows me to study when I can too, and when I'm not having a busy day I'll also be coming up with new ideas! Yay! So, just to keep ya'll updated. God Bless
Friday, July 16, 2010
My Polymer Clay Adventure 2!
I have made some more items, and I am trying different things. I'm still working on creating items I really want to sell. I've made a few items that I believe with a little tweaking can be awesome items to sell. You can let me know what you think in the comments below.
This first one pictured is a yellow polymer clay pendant with silver plated charms or dangles in the clay. On top I used some nail acrylic which I read about using in a tutorial. This piece is not finished yet, but that is the beauty of a blog is you can show progress verses just plain perfection. The idea in this is to help protect the silver plated pieces while also having the illusion of the items being in a glass like surface. I plan on doing more of these but with resin instead of acrylic, but I had acrylic handy, and no resin.
This pendant I actually made with the polymer clay in the colors shown, then used acrylic paint over them to give them a more vibrant look, then used Sculpey gloss glaze as a finish. I hand crafted each flower, leaf, and vine myself. I really like this one but I would like to eventually do this without any paint whatsoever and only the glaze.
This one is totally my fave. I can't sell this one cause I made with a not so pretty back, but it was an experiment, not perfection. This flower I handcrafted myself petal by petal and then after baking and cooling, painted with a pearl acrylic paint and then a sculpey gloss glaze. I wore this yesterday on a large link chain and it was very nice. Lots of compliments. Would you buy this? I plan on making more flowers of various shapes and designs and then doing different colors, some color combos, etch.
This one I made mostly because I've had this shell flower forever and couldn't figure out what to do with it, so I just stuck it in some poly clay and called it a day! I like this idea, but that is just me. What do you think?
Thanks for all your comments and advice.
God Bless
Christmas In July: CAPS Team
I would have posted this earlier, but my Internet was down for two days, but now I am back, yay!!
The CAPS Team (Christian Artists Promoting Shops) is having their own little Christmas in July Sale with giveaways and more! I am having my own giveaway as well with a 30% discount on all my items!
You can find more information on the sale Here.
You can also find some of the great prizes you can win for FREE Here.
My own giveaway is a gunmetal necklace and earring set. You have to participate in the thread and/or purchase items from one of the CAPS Team Etsy Stores for more chances of winning.
Here is a pic of my giveaway
I hope you all can stop by, say hi, buy something, haha! and just have fun!
Subscribe to:
Posts (Atom)


